
Whether you bought it, sold it, traded it, or simply received it from a friend, you want to make sure that the Instagram account in question is transferred correctly. Simply giving up the login/pass doesn’t work these days, and it puts your Instagram at risk of being pulled back. If you want to make sure that the Instagram you transferred stays yours, then please use our following guidelines, as they will help you secure your account.
First, let’s go over the possible dangers of losing your Instagram account
If you happened to purchase an Instagram account, you want to make sure you keep that investment secure. Merely logging in after a transaction isn’t enough to keep your account safe, mainly because on Instagram’s side, it will look like a new person took over the account. Why is this important? Well, if the seller you’ve dealt with decided to go rogue, all he/she has to do is contact Instagram support and claim that his/her Instagram account was hacked. Instagram support isn’t stupid, and they won’t take action without any concrete evidence. The very first thing Instagram support will check for is the history of the account. Instagram keeps logs of everything, including email changes, password changes, login IP’s, account actions, etc. If they see that a new login (you) instantly changed the email + pass, they will side with the rogue seller and give him/her their account back. This is why it’s important to follow our Instagram transfer guidelines. They will provide you with a fighting chance, in case the person you obtained the account from has malicious intentions.
If possible, always try to obtain the original email address associated with the Instagram account
It’s important to have the original email associated with the creation of the account. Otherwise, you may end up losing your Instagram account. Without that OG email (in this field, “OG” stands for original), it’s a lot tougher for previous owners to claim it was hacked. With the latest GDPR laws introduced by the European Union, many companies (including Instagram) now give access to the detailed history of every account. This includes the ability to view previous phone numbers, emails, and even things like deleted messages. This gives you the ability to instantly check whether the Instagram account you’ve purchased did, in fact, come with the original email. Our sister site (SWAPD) wrote a great tutorial on how to check whether the Instagram email is original.
If the account you’ve obtained comes with the original email, follow these transfer instructions to secure the account properly.
Email transfer instructions for the seller (this is an example of what you would send the seller):
- Log in to your email.
- If you have two-factor authentication on, please disable it.
- If you have a password you often use for other things, please change it.
- Remove your phone number (if any).
- Please remove any secondary emails you may have on the account.
- If you have a forwarder set up, please disable it.
- Once finished, log out of all devices.
Instagram transfer instructions (this is an example of what you would send the seller):
- Please log in to your Instagram account.
- If you have two-factor authentication on, please disable it.
- If you have a password you often use for other things, please change it.
- Remove your phone number (if any).
- Unlink your Facebook/Twitter, or any other social media account you may have connected.
- Disconnect 3rd party apps (if any).
- Once finished, log out of all devices (desktop/mobile).
Next, you will ask the previous owner to email you the account credentials for both. Once you obtain the logins, open up your laptop and get ready for the transfer (it’s better to use a desktop device for the initial transfer). You will need to log in to the email account first, as Instagram may lock you out during the first log in. Instagram monitors IP’s, and if they see a new IP logging in, they will block the account. The only way to unlock it is via a PIN sent to the email on file. This is why it’s useful to log in to the email inbox first. If you encounter problems logging into the email, the seller didn’t follow your instructions, or you’ve encountered an email provider with exceptional security features, like Gmail, for example. Follow the prompts the email provider gives you and work with the seller to unlock the account. Once you’re logged into the email and finally unlocked the Instagram account, please change the passwords, add your phone numbers, and link your social accounts. This method is the safest and should protect your account to the fullest.
Transferring Instagram ownership without an original email
Without the original email, you run into the risk of losing your account. However, sometimes you just can’t help it as the previous owner is too attached to their inbox. To keep the risk to the minimum, use the following guideline for all Instagram transfers without an original email. Before you reach out to the seller and send him the transfer instructions, you will need to have a new email address not previously registered with Instagram.
Instagram transfer instructions (this is an example of what you would send the seller):
- Please log in to your Instagram account.
- If you have two-factor authentication on, please disable it.
- If you have a password you often use for other things, please change it.
- Remove your phone number (if any).
- Unlink your Facebook/Twitter, or any other social media account you may have connected.
- Disconnect 3rd party apps (if any).
- Change the email to: [Enter your fresh email account here]
- Once finished, log out of all devices (desktop/mobile).
- Email/send me the current password.
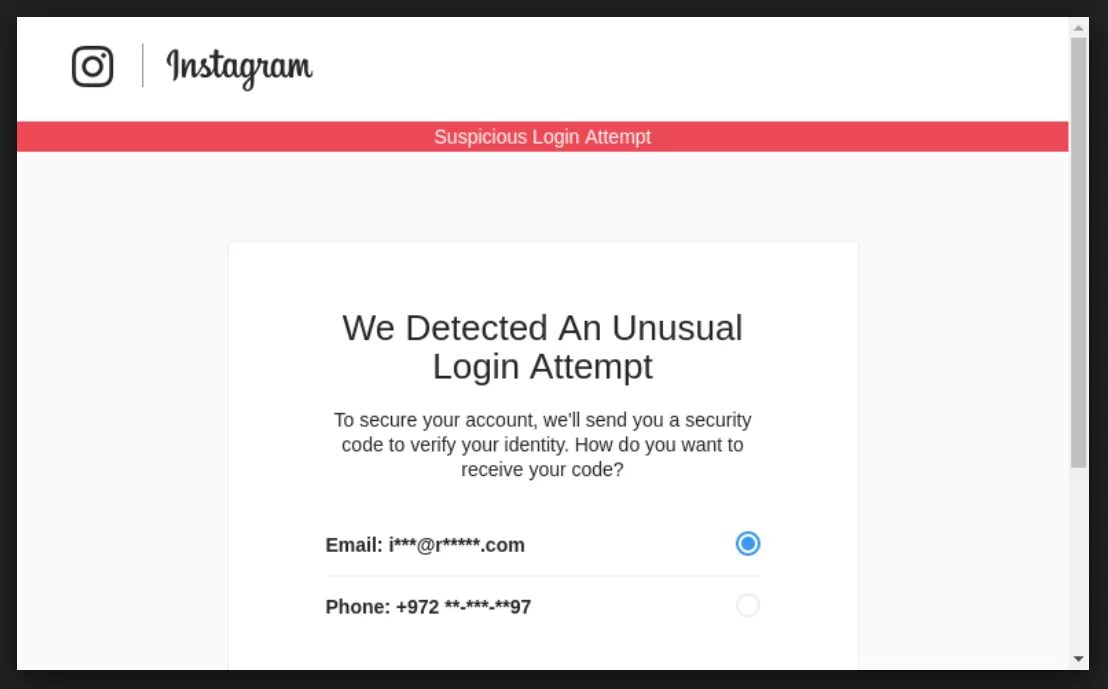
Once the seller completes all the steps, check your new inbox for the confirmation email from Instagram. The email will contain an email confirmation link you need to click. Once you do, Instagram will take you to the login page. Use the credentials to log in. During this step, you may get locked out, if you do, choose to verify by email. Navigate to your inbox, grab the pin, unlock the account, and click the confirmation link again just to make sure it registered. Once you’re logged into the Instagram account, change the password, add your own phone number, and link your social accounts. Sometimes, while logging in for the first time, Instagram may lock you out and send the unlock PIN to the old email on file, if that happens, you will need to work with the seller directly to unlock the account. Once you’re finally on the inside and changed everything, ask the seller to send you the disavow link Instagram sent him. When you change email accounts on Instagram, the old email on file receives a message from Instagram. That message will contain a disavow link, and that link allows the old owner to revert all the changes you’ve made to the account, including password/email changes. This is a huge security risk, so make sure not to skip this step. Once the seller provides you with the link (if he/she is unable to find it, just have the seller forward the email from Instagram to your email) click it, and press “It was me.”
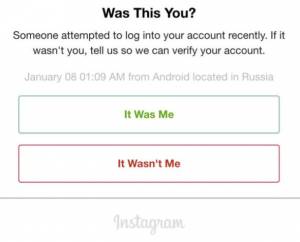 You will only see two buttons on the disavow page, and a question from Instagram that says “Someone recently changed your account information, was it you?” This link only works once, and the page goes 404 once the answer is provided. If the seller claims he/she never received such a link, back away from the transfer, as 9 out of 10 times, they are lying. But, the good news is most people are honest, and they will happily send you the disavow link. Once the disavow link step is completed, you’re pretty much set. Please keep in mind, don’t let the seller give you the account password and tell you to change the email yourself. Remember, Instagram logs everything, and if they see that you changed the email yourself, then they may suspect that the account was hacked. If the seller changes the email for you, he cannot claim that someone hacked the account, as on file, it will show that he/she willingly made the change.
In conclusion, transferring Instagram accounts isn’t easy, but if you follow our instructions, the risk of losing your newly acquired property will be minimal. Please remember, there is no 100% way to secure an account, as you cannot eliminate the human factor out of the equation, aka. Instagram staff. Securing the property on your end is the best you can do, and if you do it well, your chances of being conned are very slim.
Troubleshooting Instagram Transfers (Update 16.10.2018)
Got in trouble during an Instagram transfer? A lot has changed since we’ve first posted this article in May 2018. Email/Instagram security is getting tighter, so you may experience the following problems with Instagram transfers:
The disavow link switched the account email/phone to something I (nor the seller) recognizes. The disavow link is the very last step you do when you’re transferring Instagram accounts that do not come with the original email included. Sometimes, when you click the link, Instagram will revert the email/phone on the account to the very original one. If the account you’re buying had more than one owner, you’re in trouble. Quite often, Instagram accounts accumulate many owners over the years, so it’s not uncommon to see 5-7 owners in its history. If this is the case, and you were one of the buyers who clicked the disavow link and got unlucky, you (and the seller) may lose the account forever. This is because the seller you’re buying your IG account from may no longer be in contact with the last seller. If the chain of previous owners breaks, you won’t be able to track down the original owner. And even if you do manage to get in touch with the original owner, please remember that he/she may not help you. In fact, they may use the opportunity to try to recover the account for themselves. This is why we don’t recommend purchasing Instagram accounts without the original email, and if you do, use trusted escrow services to make sure things go smoothly.
The original email is included in the sale, but I got locked out of it. Neither the seller or I can access it. Did you think Instagram was the only pain in the butt when it came to transfers? Say hello to email security. These days, email security rivals that of online bank accounts. Sometimes, despite having every piece of login information you need (phone numbers/pin/phone confirmations), email providers may simply say “We still feel something is wrong and we’re locking your account for your security”. This happens on a daily basis on SWAPD, and it’s a painful process to get it unlocked. To fix this problem, you need to work with the seller and contact the support department of the email provider in order to get it unlocked. This process takes at least a few days, as email providers are usually short staffed and it takes them a while to respond. Again, if you feel overwhelmed by all the red tape, we suggest you let professional social media brokers handle your Instagram transfers.
I am not receiving the login PIN from Instagram. Got locked out during a transfer? Waiting for that PIN? You may not receive it at all! Before you panic, we recommend that you wait at least 30 minutes. If the unlock PIN doesn’t arrive, there are two possible scenarios that happened to the account.
- Instagram experienced a known bug where the PIN isn’t sent.
- The account got locked internally (as a security precaution).
Checking for scenario #1 is easy. To unlock your Instagram account, simply navigate to Instagram.com (via a desktop device), go to the login page, then choose to reset your password. Once you receive the reset password link via email, click it, and enter your new pass. Now, navigate back to Instagram.com, and log in with your new password. You will be yet again prompted with a PIN blockade. However, this time Instagram should email you the unlock pin. If it didn’t, you may be in trouble.
Scenario #2 usually means a death sentence to the Instagram account, unless you (or the seller) has the original email account used when registering the Instagram handle. Why? Because if you didn’t receive the PIN after a password reset, it means the account got internally locked. These locks happen without any notification or email, the account simply turns into a social property you can’t use. The only way to unlock it is to contact Instagram support. Usually their response is swift (up to three days), but they will ask you to email them from the very original email on the account, otherwise, they will refuse to unlock the account, thus making it worthless for you and the seller. This situation usually turns into a nightmare (seller/buyer blaming each other) and financial disputes arise. To avoid this, stay clear of any Instagram accounts that aren’t sold with the original email account, otherwise, you may experience an unnecessary headache.
Disclaimer: ViralAccounts.com does not condone/encourage the sale of personal Instagram accounts without Instagram’s permission. The methods discussed in this article may be subject to change and/or may be no longer valid/working.